인터넷 강의를 통해 AVFoundation과 디바이스 카메라를 다루는 방법에 대해 배우며 이해가 되지 않는 부분이 있어서 공식 문서의 샘플 코드인 AVCam에 대해 공부하고 이를 활용해 간단히 실습하려 한다.
이번 포스팅에서는 공식 문서 사이트의 주요 내용만 번역 및 정리하고, 다음 포스팅에서 실습을 진행하고자 한다.
개요
샘플 프로젝트 AVCam은 전・후면 카메라를 활용한 사진, 동영상 촬영 애플리케이션이다. 또한 사용자의 디바이스에 따라 깊이 데이터, 세로 인물 효과, 라이브 포토를 지원한다.
Capture Session 설정하기
AVCaptureSession은 카메라, 마이크와 같은 캡처 디바이스들로부터 입력 데이터를 받아들이고 동영상 파일 또는 스틸 이미지와 같은 적절한 출력 데이터를 생성하는 역할을 한다. 프로그래머는 이러한 Capture Session을 시작하고 멈추는 것을 지정할 수 있다.
AVCam에서의 세션 설정과 입출력 데이터 관리는 다음 그림과 같이 진행된다.
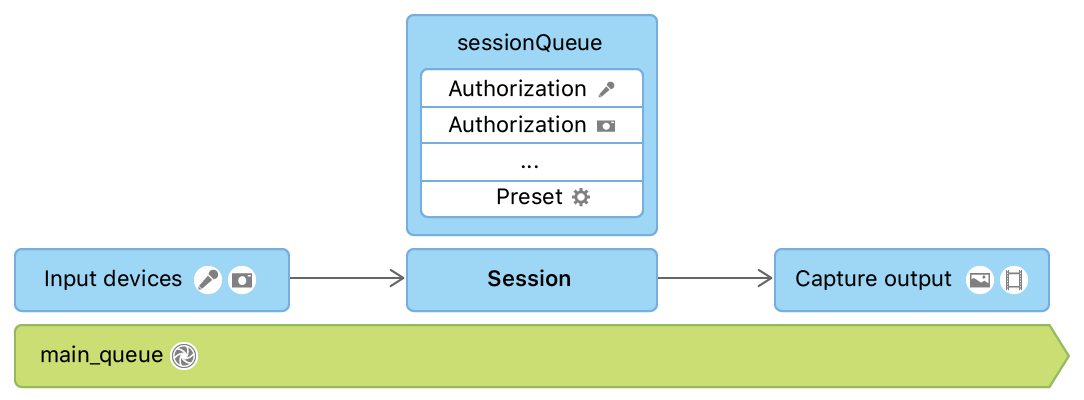
AVCaptureSession에 관련된 모든 상호작용은 직렬 디스패치 큐인 sessionQueue에 등록된다. 이는 메인 큐를 차단하는 것을 막기 위함인데, 세션 구성을 진행하는 동안 다른 작업의 실행을 차단해버리기 때문이다.
메인 큐는 사용자와의 직접적인 상호작용이 이루어지는 UI를 구성하기 때문에 메인 큐를 차단해버린다면 상호작용의 퍼포먼스가 급격히 하락하게 된다.
이렇게 설정한 Capture Session은 PreviewView의 session에 그 값을 지정한다. PreviewView는 카메라를 실행할 때 어떤 출력 데이터를 얻게 될 것인지 미리 보여주는 역할을 하는 커스텀 뷰이다.
입력 디바이스에 접근하기 위한 권한 요청하기
애플리케이션을 통해 카메라에 접근하기 위해서는 사용자 권한이 요구된다. Info.plist 파일에 설정 추가를 통해 권한 요청 메시지를 설정할 수 있다.


전후면 카메라의 전환
changeCamera 메서드는 유저가 카메라 전환 버튼을 탭할 때의 카메라 전환에 대해 다룬다. discovery session을 사용하여 사용 가능한 장치 유형을 우선 순위를 고려해 리스트 형태로 나열하고 그 리스트 중 첫 번째 장치(우선 순위가 가장 높은 장치)를 빋아들인다. 장치(카메라)의 고장이 발생했을 경우, 장치 리스트에 추가되지 않는다.
switch currentPosition {
case .unspecified, .front:
    preferredPosition = .back
    preferredDeviceType = .builtInDualCamera

case .back:
    preferredPosition = .front
    preferredDeviceType = .builtInTrueDepthCamera

@unknown default:
    print("Unknown capture position. Defaulting to back, dual-camera.")
    preferredPosition = .back
    preferredDeviceType = .builtInDualCamera
}
discovery session이 적절한 포지션의 카메라를 찾았다면, 이전의 입력 장치를 capture session에서 제거 후, 새로운 카메라를 입력으로 추가하여 전환이 가능하다.
// Remove the existing device input first, because AVCaptureSession doesn't support
// simultaneous use of the rear and front cameras.
self.session.removeInput(self.videoDeviceInput)

if self.session.canAddInput(videoDeviceInput) {
    NotificationCenter.default.removeObserver(self, name: .AVCaptureDeviceSubjectAreaDidChange, object: currentVideoDevice)
    NotificationCenter.default.addObserver(self, selector: #selector(self.subjectAreaDidChange), name: .AVCaptureDeviceSubjectAreaDidChange, object: videoDeviceInput.device)

    self.session.addInput(videoDeviceInput)
    self.videoDeviceInput = videoDeviceInput
} else {
    self.session.addInput(self.videoDeviceInput)
}
사진 찍기
사진 찍기 작업은 sessionQueue에서 이루어진다. 우선 AVCapturePhotoOutput 연결을 업데이트 함으로써 사용자가 화면으로 보고 있는 모습을 정확히 캡처한다.
if let photoOutputConnection = self.photoOutput.connection(with: .video) {
    photoOutputConnection.videoOrientation = videoPreviewLayerOrientation!
}
캡처한 출력 데이터들을 정렬한 후, AVCam은 포커싱, 플래시, 해상도와 같은 캡처 파라미터 설정을 위한 AVCapturePhotoSettings를 생성한다.
var photoSettings = AVCapturePhotoSettings()

// Capture HEIF photos when supported. Enable auto-flash and high-resolution photos.
if  self.photoOutput.availablePhotoCodecTypes.contains(.hevc) {
    photoSettings = AVCapturePhotoSettings(format: [AVVideoCodecKey: AVVideoCodecType.hevc])
}

if self.videoDeviceInput.device.isFlashAvailable {
    photoSettings.flashMode = .auto
}

photoSettings.isHighResolutionPhotoEnabled = true
if !photoSettings.__availablePreviewPhotoPixelFormatTypes.isEmpty {
    photoSettings.previewPhotoFormat = [kCVPixelBufferPixelFormatTypeKey as String: photoSettings.__availablePreviewPhotoPixelFormatTypes.first!]
}
// Live Photo capture is not supported in movie mode.
if self.livePhotoMode == .on && self.photoOutput.isLivePhotoCaptureSupported {
    let livePhotoMovieFileName = NSUUID().uuidString
    let livePhotoMovieFilePath = (NSTemporaryDirectory() as NSString).appendingPathComponent((livePhotoMovieFileName as NSString).appendingPathExtension("mov")!)
    photoSettings.livePhotoMovieFileURL = URL(fileURLWithPath: livePhotoMovieFilePath)
}

photoSettings.isDepthDataDeliveryEnabled = (self.depthDataDeliveryMode == .on
    && self.photoOutput.isDepthDataDeliveryEnabled)

photoSettings.isPortraitEffectsMatteDeliveryEnabled = (self.portraitEffectsMatteDeliveryMode == .on
    && self.photoOutput.isPortraitEffectsMatteDeliveryEnabled)

if photoSettings.isDepthDataDeliveryEnabled {
    if !self.photoOutput.availableSemanticSegmentationMatteTypes.isEmpty {
        photoSettings.enabledSemanticSegmentationMatteTypes = self.selectedSemanticSegmentationMatteTypes
    }
}

photoSettings.photoQualityPrioritization = self.photoQualityPrioritizationMode
위의 코드에서는 분리된 객체인 PhotoCaptureProcessor를 사용한다. 이는 각각의 캡처 라이프 사이클을 독립시키기 위함이다. 이는 이번 포스팅에선 다루지 않는 라이브 포토를 캡처링할 때 필요한 것인데, 라이브 포토의 경우 하나의 캡처 사이클에 여러 프레임이 포함되어 있기 때문이다.
유저가 셔터 버튼을 누를 때마다 AVCam은 capturePhoto(with:delegate:) 메서드를 호출하여 사진을 캡처한다. 일단 애플리케이션이 해당 메서드를 호출하면 사진 촬영을 시작하는 과정은 끝이 난다. 이 시점부터 개별 사진 캡처 작업은 delegate callback에서 이루어진다.
self.photoOutput.capturePhoto(with: photoSettings, delegate: photoCaptureProcessor)
PhotoCaptureDelegate를 통한 결과 데이터 추적하기
유저가 셔터 버튼을 누른 직후의 동작과정은 다음 그림처럼 표현이 가능하다.
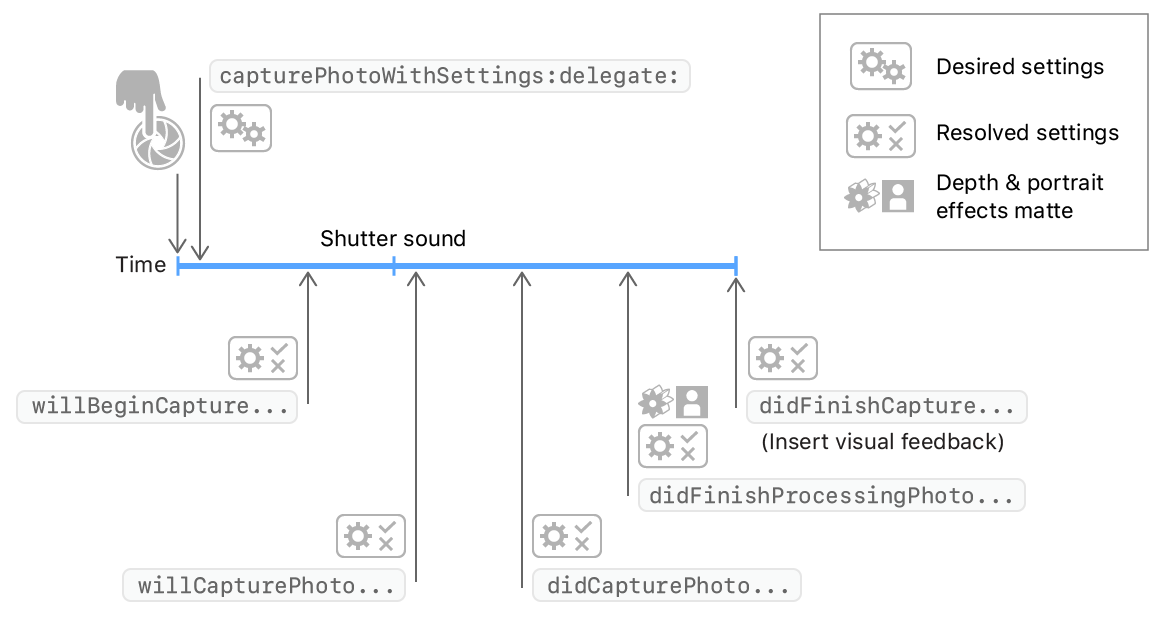
photoOutput(_:willCapturePhotoFor:): 시스템이 셔터 소리를 재생한 직후 실행된다. AVCam은 셔터 소리가 진행될 동안 화면을 깜빡이고 유저가 카메라를 작동하지 못하게 막는다. 아래의 코드 예시는PreviewView의 레이어 투명도를 0에서 1로 변화 시켜 플래시 효과를 내는 방법에 대해 표현하고 있다.// Flash the screen to signal that AVCam took a photo. DispatchQueue.main.async { self.previewView.videoPreviewLayer.opacity = 0 UIView.animate(withDuration: 0.25) { self.previewView.videoPreviewLayer.opacity = 1 } }photoOutput(_:didFinishProcessingPhoto:error:): 시스템이 깊이 데이터와 인물 모드 처리를 끝낸 후 실행된다. AVCam에서는 이 과정에서 인물모드 효과와 깊이 메타데이터가 적용되었는지 체크한다.// A portrait effects matte gets generated only if AVFoundation detects a face. if var portraitEffectsMatte = photo.portraitEffectsMatte { if let orientation = photo.metadata[ String(kCGImagePropertyOrientation) ] as? UInt32 { portraitEffectsMatte = portraitEffectsMatte.applyingExifOrientation(CGImagePropertyOrientation(rawValue: orientation)!) } let portraitEffectsMattePixelBuffer = portraitEffectsMatte.mattingImage let portraitEffectsMatteImage = CIImage( cvImageBuffer: portraitEffectsMattePixelBuffer, options: [ .auxiliaryPortraitEffectsMatte: true ] )photoOutput(_:didFinishCaptureFor:error:): 하나의 사진에 대해 캡처의 끝을 알리는 마지막 콜백이다. AVCam에서는 delegate와 setting을 지워 부가적인 사진 캡처링 결과가 남지 않도록 한다.self.sessionQueue.async { self.inProgressPhotoCaptureDelegates[photoCaptureProcessor.requestedPhotoSettings.uniqueID] = nil }
라이브러리에 사진 저장하기
앞서 Info.plist에서 카메라 접근 권한을 얻을 때 라이브러리 접근 권한을 함께 얻었으므로 라이브러리에 사진을 저장할 수 있다. AVCam은 fileOutput(_:didFinishRecordingTo:from:error:) 콜백 메서드를 통해 권한을 체크하고 AVCaptureOutput이 출력으로 저장할 미디어 데이터를 제공한다.
func fileOutput(_ output: AVCaptureFileOutput,
                    didFinishRecordingTo outputFileURL: URL,
                    from connections: [AVCaptureConnection],
                    error: Error?) {
    // 생략

    if success {
        // Check the authorization status.
        PHPhotoLibrary.requestAuthorization { status in
            if status == .authorized {
                // Save the movie file to the photo library and cleanup.
                PHPhotoLibrary.shared().performChanges({
                    let options = PHAssetResourceCreationOptions()
                    options.shouldMoveFile = true
                    let creationRequest = PHAssetCreationRequest.forAsset()
                    creationRequest.addResource(with: .video, fileURL: outputFileURL, options: options)
                }, completionHandler: { success, error in
                    if !success {
                        print("AVCam couldn't save the movie to your photo library: \(String(describing: error))")
                    }
                    cleanup()
                }
                )
            } else {
                cleanup()
            }
        }
    } else {
        cleanup()
    }
}
출처: https://developer.apple.com/documentation/avfoundation/cameras_and_media_capture/avcam_building_a_camera_app
https://developer.apple.com/documentation/avfoundation/cameras_and_media_capture/capturing_still_and_live_photos/tracking_photo_capture_progress